The Rules of Solo Flawless
The triumph requires completing the entire dungeon solo, in a single run, with zero deaths. The details that decide runs before they start:
- One death ends it. Any death voids flawless — there are no free deaths anywhere, including traversal.
- Single run, but not single sitting. You can leave to orbit and resume from your checkpoint, as long as the activity doesn't reset and you never die. Many players bank a boss checkpoint and finish fresh the next day.
- Solo means solo — the triumph tracks completing every encounter alone.
- Practice deaths don't follow you. Deaths in a previous run mean nothing; each fresh launch is a clean slate.
Since Update 9.7.0 every dungeon is permanently launchable from the Raids & Dungeons node, so you can attempt any of these any week — featured status only changes loot, not availability. Solo flawless completions pay an exclusive emblem per dungeon and count toward triumphs that raise dungeon exotic drop rates. For the fireteam-facing view of all eleven — loot tables, team difficulty, featured rotation — see the full dungeon guide.
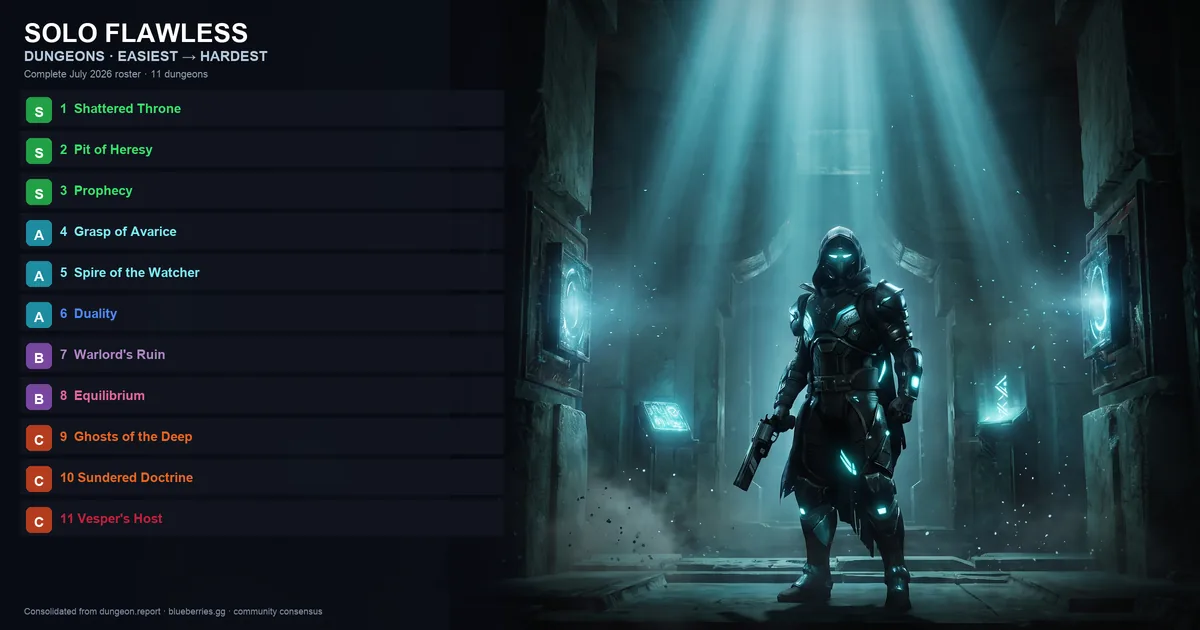
The Ranking: All 11, Easiest to Hardest
Consensus July 2026 solo-flawless ladder for the complete roster (Shattered Throne → Equilibrium). Tier badges: S starter · A middle · B hard · C nightmare. Class icons = recommended sustain pick.
| # | Tier | Dungeon | Best class | Solo flawless emblem | Main run-killer | Realistic budget |
|---|---|---|---|---|---|---|
| 1 | S | Shattered Throne |   Warlock Warlock | The Eternal Return | Careless platforming | 40–60 min |
| 2 | S | Pit of Heresy |  Warlock Warlock | Crimson Echoes | Chamber of Suffering | 45–70 min |
| 3 | S | Prophecy |  Warlock Warlock | Prophetic Visionary | Knight burst in dark rooms | 50–80 min |
| 4 | A | Grasp of Avarice |   Hunter Hunter | Piratical Ambitions | Sparrow gauntlet | 60–90 min |
| 5 | A | Spire of the Watcher |  Titan Titan | Flight of Soteria | Persys HP fatigue | 60–90 min |
| 6 | A | Duality | Warlock | Untouched by Opulence | Missed bells = death | 75–120 min |
| 7 | B | Warlord's Ruin | Hunter | Tattered Regalia | Hex of Vengeful Corruption | 75–120 min |
| 8 | B | Equilibrium | Warlock | Stand Alone | Lightning Hands at Dredgen Sere | 60–120 min |
| 9 | C | Ghosts of the Deep | Warlock | A Grave Matter | Šimmumah marathon HP | 2–3+ h |
| 10 | C | Sundered Doctrine | Warlock | Pyramid's Pilot | Zoetic Lock + tick damage | 2–3+ h |
| 11 | C | Vesper's Host |  Warlock Warlock | Station's Savior | Instant-death mechanics | 2–4 h |
Budgets assume you already know the dungeon and have practiced each encounter; they cover the successful run plus honest resets. First-timers should double them.
The Starter Tier: Shattered Throne, Pit of Heresy, Prophecy
S Shattered Throne (1) is where everyone should start. Years of power creep turned every encounter into a formality — the genuine threats are the ogre's stomp and your own impatience on jumping puzzles. Dûl Incaru dies in one or two phases to any competent DPS setup. Prismatic Warlock with Devour is the safest first emblem.
Pit of Heresy (2) adds one real filter: the Chamber of Suffering, where you hold a plate under continuous Knight pressure. Bring a wave-clear build, stay calm for two totem cycles, and the rest is a victory lap — Zulmak melts to modern damage. Prefer Solar sustain.
Prophecy (3) is the first dungeon that asks you to execute mechanics under pressure: mote banking in the Hexahedron while Taken Knights burst you from angles. It teaches the single most transferable solo-flawless skill — patience in a room that punishes greed. All three are also the fastest completions on the board, which makes them ideal for building the habit of finishing runs you started well.
The Middle Tier: Grasp, Spire, Duality, Warlord's Ruin
A Grasp of Avarice (4) would rank easier if not for the sparrow gauntlet — a timed traversal ride where one clipped wall ends thirty minutes of clean play. Practice the route until it's boring; the Fallen Shield and Avarokk encounters are tame by comparison. Arc Hunter mobility helps the gauntlet.
Spire of the Watcher (5) is mechanically the simplest modern dungeon — wire-connecting and honest gunfights — but Persys has a giant health pool for a solo player, and fatigue is the real boss. Take the extra phase instead of forcing a risky two-phase. Solar Titan Consecration melts adds between wires.
Duality (6) is a rules test: bell timing is binary, and standing in the wrong realm when the deadline hits is death regardless of your build. Once bell discipline is automatic, Caiatl's fight is one of the most satisfying solo clears in the game.
B Warlord's Ruin (7) is the lethality step-up — freezing winds, Taken blights, and the Hex of Vengeful Corruption debuff that wipes you if you can't break it in time. Nothing here is unfair; everything here is punishing. This is the tier where meta builds stop being optional — pull current picks from our god roll guide before attempting.
The Nightmare Tier: Equilibrium, Ghosts, Sundered Doctrine, Vesper's Host
B Equilibrium (8) — the Renegades dungeon (Dec 2025) and the newest on the board — is the most approachable of the modern four, but that's grading on a brutal curve. Dredgen Sere's Lightning Hands interrupt and the Shadow Power economy demand constant attention, and the traversal between encounters one and two has ended more flawless runs than the bosses. Praxic Blade's block trivializes several kill mechanics — abuse it. A clean solo flawless lands around 45–60 minutes, which also makes it the fastest nightmare-adjacent clear. Emblem: Stand Alone.
C Ghosts of the Deep (9) is an endurance exam. Mechanics are fair and readable; the problem is Šimmumah's enormous health pool with solo damage — expect five or more phases, each a full mechanics cycle where one moment of autopilot deletes the run. Most failed attempts die past the two-hour mark.
Sundered Doctrine (10) layers symbol logic, constant tick damage during DPS, and the Zoetic Lock's add bombardment. It demands the most multitasking of any dungeon — mechanics brain and survival brain running simultaneously for two-plus hours.
Vesper's Host (11) remains the community's consensus hardest solo flawless: instant-death mechanics through the whole dungeon, memory puzzles under fire, and the Corrupted Puppeteer's boss-room chaos. The emblem, Station's Savior, is the rarest flex on the board.
Universal Solo Flawless Advice
- Build for survival, not speed. Devour Warlocks, Praxic Blade block, restoration Solar builds, and Combination Blow Hunters exist for exactly this. A four-phase clear beats a three-phase corpse.
- Practice encounters non-flawless first. Deliberately die learning each fight's rhythm; a failed practice phase teaches more than any guide.
- Bank the checkpoint. Reaching the final boss clean? Go to orbit, rest, and finish fresh — the run persists as long as you don't die or let the activity reset.
- Have a panic button. A defensive Super, a Praxic block, or a healing grenade you never use except to cancel a mistake.
- Kill the distractions. Two hours of focus dies to one Discord ping mid-DPS.
- Respect traversal. More flawless runs end to falls and trap corridors than to bosses. Slow down between encounters — the timer isn't real.
- Stop at two failed attempts a night. Tilt is the true final boss of every dungeon on this list.
When to Grind It — and When to Call In a PRO
The honest math: starter-tier emblems cost an evening each. The middle tier costs a weekend of practice per dungeon. The nightmare tier costs what it costs — Vesper's Host solo flawless routinely eats ten-plus hours of attempts even from players with every other emblem on the list.
If a specific emblem, triumph, or the drop-rate boost is the goal and the time isn't there, our PRO dungeon runners complete solo flawless runs on your behalf — any dungeon on this list, including Vesper's Host and Sundered Doctrine, done by players who have these runs on farm. You keep the emblem, the triumph, and the exotic odds boost without donating a month of evenings to the Puppeteer.